Rosette Collar Jacket by Romeo Gigli yes! he's back, designing an exclusive capsule collection for the HK store, Joyce. Swoon
Perhaps one of Balenciaga's greatest desires was to search for the perfect sleeve. He believed that a sleeve should adhere to the body, be its natural extension, and fall without the slightest flaw. It should be supple enough to allow movement but without dragging on the rest of the silhouette. (Pamela Golbin and Fabein Baron, Balenciaga Paris)
While there are many types of sleeves, the two-piece or tailored sleeve is generally used for coats and jackets. If you return to Week 2, Menswear, I have the instructions for drafting a sleeve and turning it into a two-piece sleeve.
 Begin by comparing your armhole measurement with your two pattern sleeve pieces by measuring around the seam line on the patterns, but not including the seam allowances. The two sleeve pieces should be 1 1/2-2 inches (3.3-5 cm) larger than the armhole. Without this ease, the sleeve will not fall gracefully from the shoulder. Begin by comparing your armhole measurement with your two pattern sleeve pieces by measuring around the seam line on the patterns, but not including the seam allowances. The two sleeve pieces should be 1 1/2-2 inches (3.3-5 cm) larger than the armhole. Without this ease, the sleeve will not fall gracefully from the shoulder.
Adjust the sleeve pattern pieces by adding or subtracting only the top edge of the upper sleeve. The under sleeve is not adjusted.
Now check the length of the sleeve and make any adjustment at the elbow line.
 |
| kriss van assche |
Make a muslin toile for the sleeves from your adjusted pattern pieces. Mark the grain line, bicep line, and elbow line onto the muslin toile fabric. Machine-stitch the top and lower sleeve pieces together; press the seam allowances open and flat; baste-stitch them into the armholes of the jacket, matching the 4 notch points, underarm, sleeve shoulder point, and front and back notches, evenly distributing the ease around the top of the armhole as you stitch.
(There will be some puckering in the muslin sleeve cap that will disappear in the garment or fashion fabric)
Check the sleeve from the side. If the sleeve is correctly balanced, the grain line will hang vertically from the shoulder point to the floor. There should be no pulling in the front or back sleeve cap.
Tailored Fashion Design, page 129
Rotate the sleeve forward or backward until the creases disappear; chalk-mark the front and back notch points on both the jacket body and sleeve; chalk-mark the shoulder point on the sleeve head, and transfer these markings to your pattern.
 |
| Cutter and tailor, this is what often happens in the back. As soon as the wearer is moving his arms forward, his arm is restricted by the shape of the armhole; reset the sleeve, letting out through the back of the jacket |
Recheck the sleeve length and make any correction.
Shaping the sleeve
Cut the sleeve out in your fashion fabric; keeping the top sleeve pieces together, stretch the short curved seam of the top sleeve at the elbow; using a steam iron, wrong side of the fabric up on a table or ironing board with the short seam closest to you, place the hot iron over the seam allowance approximately 2 inches (5 cm) up from the elbow; using a shot of steam, run the iron down the seam allowance, finishing approximately 2 inches (5 cm) below the elbow; while doing this with your other hand, stretch the seam away from you. Make sure you don't press the iron onto the sleeve more than 1 inch (2.5 cm); turn the top sleeve over and repeat. Repeat with the other top sleeve. Woolen and loosely woven fabrics will stretch easily. Worsted and tightly woven fabrics, regardless of fiber content, can be harder to stretch, and you may need to repeat the technique several times. Leave the fabric to dry before stitching the under sleeve to the top sleeve along the underarm seam line, then press open; begin and end with a back tack. Press the seam allowance open and flat over a ham.
 |
Reinforce the lower hem edge with a 5-inch (12.5 cm) strip of bias-cut pocketing or fusible interfacing; place it about 1 inch (2.5 cm) up from the lower raw edge, then fuse or baste-stitch the pocketing in place if using.
|
 Fold and press the vents and then the hem on the back of the top sleeve; miter the hem and vent at the top vent to remove bulk (Page 131, Tailored Fashion Design). Fold the hem back so the right sides are together on the under vent, and machine-stitch down the hem, beginning and ending with a back tack. Fold the hem under to the wrong side and press the vents and hem in place; baste stitch along the top of the hem. Fold and press the vents and then the hem on the back of the top sleeve; miter the hem and vent at the top vent to remove bulk (Page 131, Tailored Fashion Design). Fold the hem back so the right sides are together on the under vent, and machine-stitch down the hem, beginning and ending with a back tack. Fold the hem under to the wrong side and press the vents and hem in place; baste stitch along the top of the hem.
Mark the buttonhole placements on the under sleeve vent: the first buttonhole will be 1 1/4 inches ( 3cm) up from the lower hem edge of the sleeve and 1/2 inch in from the folded end of the vent; each buttonhole is placed 5/8 inch apart; make a mark 5/8 inch (1.5 cm) above the last button placement. mark. Make the buttonholes either by hand or machine.
Stitch the top and under sleeves together down the back seam line to the chalk mark; press the seam open, working over a ham; shrink out any puckers in the seam allowance so the seam allowance lies flat; baste-stitch the vent closed.
Setting the sleeve
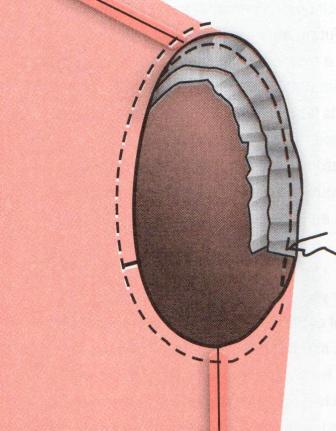
 Set the sleeve into the jacket armhole the same way as the muslin sleeve, but this time remove the ease in the sleeve head. Place the sleeve cap over a tailor's ham and, with a shot of steam or damp cloth, shrink out the fullness in the seam allowance; let the sleeve cap dry completely before removing it from the ham. Set the sleeve into the jacket armhole the same way as the muslin sleeve, but this time remove the ease in the sleeve head. Place the sleeve cap over a tailor's ham and, with a shot of steam or damp cloth, shrink out the fullness in the seam allowance; let the sleeve cap dry completely before removing it from the ham. A line of running stitches can be worked along the seam allowance close to the stitching line; pull on the stitches to remove the ease in the seam allowance; place over a ham and, with a shot of steam or damp cloth, shrink out the fullness in the seam allowance;
Place the left sleeve into the left armhole with the right sides together, and pin at the shoulder point, underarm, and front and back notch points. Baste stitch the sleeve in place beginning at the front notch point and working up towards the shoulder point. Slightly increase the amount of ease in the sleeve cap as you get closer to the shoulder. Continue baste stitching over the shoulder and down to the back notch point. Turn the sleeve to the right side and, with your fist inside the shoulder, check that the sleeve looks correct in the front; if not, unpick the stitching and start again. Finish basting the sleeve in place. Press and shrink out any wrinkles in the seam allowance.
Machine stitch the sleeve in place starting at the back notch point; stitch around the underarm of the sleeve, up the front, over the shoulder, being careful not to move any ease as you go, and down the back of the sleeve to the notch point. Press the seam allowance into the sleeve.
The sleeve head
 The sleeve head is a strip of cotton wadding covered with muslin. It may also have a strip of bias-cut hair canvas. Place the edge of the sleeve head along the seam allowance edge facing into the sleeve, starting at the front notch point, and machine-stitch the sleeve head to the seam allowance, finishing about 2 inches below the back notch point. Cut off any extra sleeve head. The sleeve head is a strip of cotton wadding covered with muslin. It may also have a strip of bias-cut hair canvas. Place the edge of the sleeve head along the seam allowance edge facing into the sleeve, starting at the front notch point, and machine-stitch the sleeve head to the seam allowance, finishing about 2 inches below the back notch point. Cut off any extra sleeve head.
|




No comments:
Post a Comment