Tailoring 101 Week 7 The jacket/coat back

J.W. Anderson Fall 2014 collection.
The back vent
Once the vent was a necessity if traveling by horseback. Think of those cavalry officers riding all day in their tight fitting jackets. The vent stopped the jacket from bunching, creasing and constricting the body while seated. OK, so we don't travel by horseback today but the same principles applies in the situation where you are seated in a jacket. You don't want to be uncomfortable while sitting but more importantly you don't want to have a creased up jacket when you stand.
Next question how many vents?

The double or side vented jacket is seen today as been English tradition and the most expensive to make.But it does not suit all body shapes, a protruding bottom for one.
The single vent is a favorite of American men. It is cheaper to make and suits most if not all body shapes.
And finally the jacket back with no vent. This is the quickest and cheapest to make.
Vents are favored by both men and women with the single vent. For women the left side overlaps the right side and for men the opposite, right side overlaps the left side. Start the vent down from the natural waistline where the body straightens out so that the vent will follow the contours of the body and sit together.
Draw a line out from the centre back line (single vent) approximately 2 inches (5 cm) and square down to the hem line; add seam and hem allowance. For a double vent draw a line out on the side back panel and the side of the centre back panel approximately 2 inches (5 cm) and square down as for the single vent.
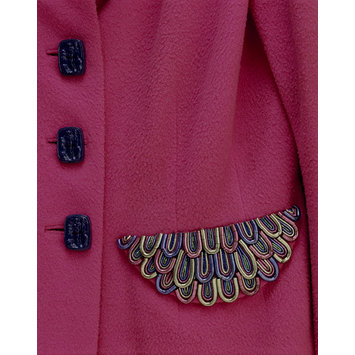
Adding a back peplum
I had to include this jacket back from what likes like a jacket from the 1940's.

But the peplum can be a lot simpler with less fullness. I can only imagine this as the back of an evening jacket.
Shrinking and stretching
Depending on how fitted the jacket back the seam allowances at the waist line may have to be stretched so that when the seam is sown the seam allowance will lay flat.
Dampen the fabric to be stretched then pass the iron over the area to create steam. Now just using the point of the iron over the damp cloth pull the fabric at an angle so that the raw edge stretches. Be careful not to stretch beyond the seam line. The seam allowance should ripple along the raw edge. Let the fabric dry. Repeat on all the back panel pieces though the waist area.
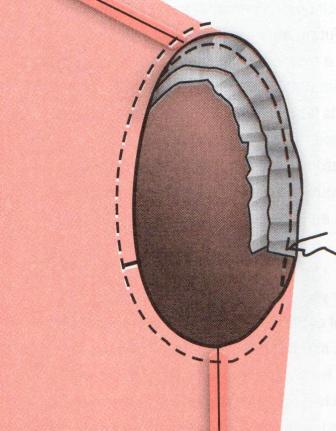
Shrink the shoulder and armhole area
Place the shoulder area onto a ham; dampen the shoulder area and press to shrink the ease from the shoulder seam allowance. Finish by pressing the whole of the shoulder area. Shrink the armhole seam allowance to make it easier to attach the sleeve in the same way.
Be careful not to scorch the fabric.
Adding support to the jacket back
To add more support to the jacket back after it has been shrink and stretches you are going to attach fusible interfacing to the neckline and armholes. This is optional but I do get my students to add this support as their garments are being carried back and forth to college.

I use my scrapes to do this as the fusible interfacing can be joined together; cut strips of fusible interfacing the width of your seam allow long enough to fit around the back neckline and armholes; Holding the fusible interfacing taut and not stretching the fabric, fuse around the back neck line edge; repeat around the back armholes.
If you are working with a heavy coating fabric, loosely woven fabric or a design that is going to need more support in the shoulder area add a back stay. Depending on your choice of fashion fabric a back stay can be cut from cotton muslin,lawn, batiste or silk organza. The back stay is cut on the bias with no centre back seam.
Working off your fabric back pattern pieces that have had support attached or shrink and stretched; on the stay fabric draw a line down the centre that is following the true bias or cross grain of the fabric; place the jacket back on the table over the fabric you are using to making the stay making up the centre back seam line with the drawn line on the stay; measure down the centre back approximately 3-4 inches 7.5-10 cm) and mark; draw a line from this mark that curves down into the underarm. Baste the back stay to the jacket back around the armholes, across the shoulders and back neckline once all the back jacket panels have been attached.
The back can also be completely interlined with silk organza, cotton organdy, batiste or even a light weight muslin if you are working with a fine silk, wool or other fancy fashion fabric.
Back vents and hemline support
Cut a 2 inch wide (5cm) strip of fusible interfacing or bias cut pocketing the length of your back hemline. Place the strip up from the bottom raw edge of the hem 1/2 inch (1 cm) and fuse onto the hem or baste stitch in place; Cut a 2 inch (5 cm) wide strip of fusible interfacing or bias cut pocketing the length of the vent and fuse or baste stitch in place.
Sew all the back panels together and press the seam allowances open and flat. If you have a back vent(s) stitch down the back panels to the to the notch point marking the top of the vent; press the vent either to the right or left side or press the vents in towards the centre back seam.
Fold the hem up along the hemline and press.
Mitering the vent hem
Mitering the hem and facing of the top overlapping vent will reduce bulk making sure that the finished vent will sit flat

Make a clip into the top of the hem where the jacket hem and vent facing meet
Open the hem and vent facing and lay flat on the table; draw a line across connecting the 2 clips


fold the fabric back at a 45% angle, right sides are and the 2 clip marks are together and machine stitch from the point to the seam allowance at the raw edge of the hem; back tack both the start and finish of this seam
Cut off the extra fabric leaving approximately 1/4 inch (5mm) of seam allowance and press the seam open and flat


On the under side of the vent turn the hem back on itself right side of fabric together and sew along the seam line from the fold.

Turn the hem and vent facings to the right side and press

(sorry about the white threads showing where I have unpicked, but this was my class demo sample)
The back is now ready to be attached to the jacket fronts. Baste stitch the shoulders and side panels of the fronts to the jacket back for a fitting. If you are not sure of the length do not make the mitre in the vent until after the fitting.
Fit the jacket body. Look back to Week 4 "Fitting the toile" and make any alterations to the jacket body. Once you are happy with the fit machine stitch the shoulders and side panels of the back to the jacket fronts. Press the seam allowances open and flat.
Week week - The Front Facing and bound button holes


 Turn the front to the wrong side; cut the canvas (only) away from the buttonhole position line, A.


 folded strip that matches lines B-C; stitch across from one pin to the other starting and finishing with a back tack exactly in the centre between the fold and A. This makes the piping for the buttonhole.


 Pull the piping strips to the wrong side and pull the ends to square up the corners of the buttonhole and that the folded edges meet in the centre of the buttonhole. Be careful not to pull on the triangles. Place the front right side up on the table and fold back the jacket so that you can see the triangle sitting on top of the ends of the piping strip; stitch the triangle to the piping strip making sure that the first row of stitches is close to the folded back line.
 The back of the buttonhole will be finished after the front facing has been attached.

 Trim the canvas back out of the seam allowance; fuse interfacing to the wrong side of the centre front seam allowance; right sides together, place the separating zipper so that one side of its teeth are sitting along the center front line and that the top of the zipper is approximately 1/4 inch (5 mm) down from the neckline stitching line; the lower end of the zipper is going to be approximately 3/8 inch (1 cm) up from the hem line; machine stitch along the outer edge of the zipper tape
  Make a guard that is going to be slightly shorter than the front opening with the finished wide approximately 3/4 inch (1.9 cm) plus 1-1 1/2 inches (2.5-3.5 cm).
 Finish by top stitching the zipper in place.
 But the peplum can be a lot simpler with less fullness. I can only imagine this as the back of an evening jacket.
 Make a clip into the top of the hem where the jacket hem and vent facing meet
 fold the fabric back at a 45% angle, right sides are and the 2 clip marks are together and machine stitch from the point to the seam allowance at the raw edge of the hem; back tack both the start and finish of this seam
 On the under side of the vent turn the hem back on itself right side of fabric together and sew along the seam line from the fold.